Gone are those 18-week passport processing times from the pandemic. The US passport application process has become simpler, and routine service now takes just 4-6 weeks. travel documents for U.S. citizens are the greatest freedom we have, and you’ll see that once you get out of the country.
The process might seem daunting when you’re planning your first international trip or even when its time for a U.S. passport renewal. Many travelers share this feeling, but thankfully, the U.S. passport application process has become more convenient than ever, and most travelers can now renew their passports online at any time.
A few important details to consider: Adult passports cost $165 total ($130 application fee plus $35 acceptance fee). You’ll need specific documents and photos that meet strict requirements. This guide will help you navigate each step, go over the U.S. passport requirements, and figure out just how to apply for a U.S. passport – from document preparation to application tracking.
Are you ready to begin your passport application? Let’s explore the essential steps to obtain your blue book of international travel. No better time to leave the U.S. than now, and if you are reading this, I’m sure you agree.
What You Need Before Starting
Getting the right documents ready before visiting the passport office saved me hours of frustration. First-time passport applications need specific papers that prove U.S. citizenship and identity.
Required Documents Checklist
Form DS-11 is the life-blood of your application, along with proof of U.S. citizenship. You’ll also need:
- Original citizenship evidence with one photocopy
- Valid photo ID with one photocopy
- Recent passport photo
- Payment for fees
Your photocopies must be black and white on standard 8.5″x11″ paper, single-sided. This detail really matters – unclear copies can slow down your application.
Acceptable Forms of ID
Bring at least one of these primary documents to prove your identity:
- Valid driver’s license or enhanced driver’s license
- Current passport (even if expired)
- Government or military ID
- Certificate of Naturalization
- Certificate of Citizenship
You’ll need a second form of ID if your original ID comes from a different state than where you’re applying. This requirement made me nervous at first, but everything went smoothly once I had the right documents.
Getting Your Birth Certificate Copy
The process to get your birth certificate is manageable. Your birth state’s vital records office can provide a certified copy. The certificate should include:
- Your full name and date of birth
- Place of birth
- Parent(s) full names
- Registrar’s signature
- Official seal or stamp
- Filing date (within one year of birth)
The vital records office can help verify your identity through other means if you can’t find your birth certificate:
- Your sworn statement of identity
- A notarized letter from a parent listed on the birth certificate
Note that electronic or mobile birth certificates aren’t accepted. Processing times vary by state, so plan ahead. Some states offer faster services for an extra fee.
My experience taught me that organizing these documents properly beforehand makes the application process run smoother. Keeping originals and copies in separate labeled folders helped me stay organized during my appointment.
Step-by-Step Application Process
I walked into the passport acceptance facility with my documents, taking a deep breath. The process was simpler than I imagined after I organized everything properly.
Filling Out Form DS-11
Form DS-11 serves as your gateway to international travel. While completing mine, I found several key points:
- Fill out the form online using the official Form Filler tool
- Print single-sided on standard 8.5″x11″ paper
- Important: Do not sign the form until instructed by the acceptance agent
Here’s a helpful tip I learned: check the ‘large book’ box at the top of DS-11 if you plan extensive travel. This gives you extra visa pages at no extra cost.
Getting Your Passport Photo
The photo requirements seemed overwhelming at first, but they’re quite straightforward when broken down. U.S. passport photo requirements seem more complicated than they are. Here’s what worked for me:
Your passport photo must meet these specifications:
- 2×2 inches in size with head height between 1-1⅜ inches from chin to crown
- Taken within the last 6 months
- Clear, high-resolution color photo against a white or off-white background
- Printed on photo-quality paper (matte or glossy)
I wear glasses and learned that they must be removed for passport photos – a rule that changed in 2016. You can keep them on with a doctor’s note if you have a medical necessity.
You can get your photo taken at:
- Passport acceptance facilities
- Professional photo services
- At home (with help from someone else – no selfies allowed!)
I ended up choosing a local passport acceptance facility because they guaranteed compliance with all requirements and could retake the photo if needed.
My experience taught me to avoid wearing uniforms or uniform-like clothing in your photo. While jewelry and facial piercings are allowed, they shouldn’t obscure your face.
The reassuring part? A Department of State employee reviews every photo to ensure it meets requirements. This helped ease my mind about my expression (you can smile, just keep your mouth closed!).
Keep in mind that your photo should stay separate from the application – don’t staple it yourself. The acceptance agent will handle that part. Letting the professionals handle these small details made the process less stressful.
Understanding Processing Times
I tracked my application’s progress through the system after submitting it. My anxiety about getting travel documents eased once I understood passport processing times. I was in a hurry to get my U.S. passport for international travel, but understand that impatience will not hurry the U.S. passport process.
Regular vs Accelerated Service
Your travel timeline determines the choice between regular and accelerated service. Regular processing is cheaper with longer wait times. The accelerated service for an expedited U.S. passport gives you faster turnaround for an extra $60. My research showed that accelerated service might be worth the cost if time is significant. Faster passport processing time is more than worth the extra $60, especially at this point in history. It’s time to get out of the U.S.
Current Wait Times
Routine passport processing takes 4-6 weeks. This marks a big improvement from delays during the pandemic. The processing times only count the time your application spends at the passport agency.
The total timeline looks like this:
- Original mailing: Up to 2 weeks to reach the agency
- Processing period: 4-6 weeks for routine or 2-3 weeks for accelerated service
- Return shipping: Up to 2 weeks to get your completed passport
The actual door-to-door time could stretch beyond the official processing window. A useful tip I found: applications between October and December process faster due to lower seasonal demand.
Tracking Your Application
Tracking became my new hobby once I submitted my application. The process is simple – you’ll need:
- Your last name (including suffixes)
- Date of birth
- Last four digits of your Social Security Number
The online status system shows several stages:
- Not Available: Your application hasn’t reached the processing center yet
- In Process: Your application is under review
- Approved: Review complete, passport printing begins
- Passport Mailed: Your document is on its way
The email update system proved really helpful. You get automatic notifications about status changes by adding your email to the application. You also receive a tracking number for the passport book once it ships.
Special appointments at passport agencies are available if you need to travel within 14 days or get a foreign visa within 28 days. All the same, applying six to nine months before your passport expires or planned travel helps avoid stress.
Avoiding Common Application Mistakes
My passport application experience taught me that two things caused the most worry: getting the right photo and making proper payments. These common roadblocks turned out to be easier than I thought once I knew what to do.
Photo Requirements
The biggest reason passport applications get delayed? Photos that don’t meet the rules. After some trial and error, I found that there was a set of important photo rules:
Your photo must be:
- Taken within the last 6 months
- Printed on matte or glossy photo-quality paper
- 2×2 inches square with head height between 1-1⅜ inches
- Clear, without blurriness or pixelation
Here’s something that caught me off guard: you can smile, but keep your mouth closed. Of course, big grins are out – the State Department wants neutral expressions. You can’t take selfies either – someone else needs to take your photo.
There’s another reason to be careful: filters or digital touch-ups will get your application rejected right away. You also can’t scan an already printed photo. The best way is to take a direct digital photo against a plain white or off-white background.
Payment
The payment process is a vital part of the application. People most often mess up by sending wrong amounts or using payment methods that aren’t accepted.
New applicants need to make two separate payments:
- Application fee to the U.S. Department of State
- Execution/Acceptance fee to the acceptance facility
These facilities usually take:
- Personal checks and money orders
- Credit cards (some places charge extra)
- Cash (exact amount needed)
Starter checks won’t work, and you must write “U.S. Department of State” correctly as the payee. Any marks or cross-outs on checks will lead to rejection.
A tip that saved me some headaches: verify your payment amounts before submitting. Wrong fees can slow down the whole process. The extra time I spent double-checking payment details helped me avoid delays in my application.
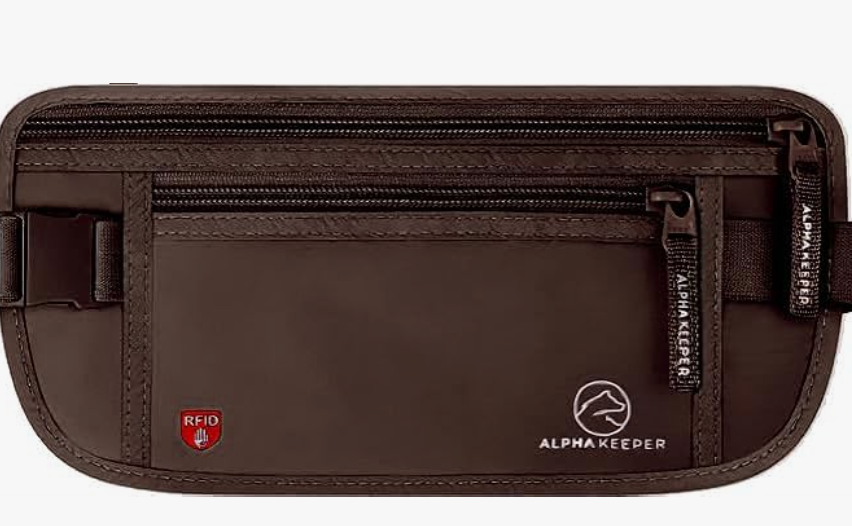
One very helpful thing I purchased before leaving the US, was an around the belly passport wallet. Pickpockets are common everywhere, including the US, but nothing compares to losing your money and passport in a foreign country. And now that you need to carry your passport, keeping it someplace safe that isn’t too bulky and is virtually impossible to steal is of the utmost importance.
This wallet from Amazon, sits underneath your shirt, but above your pants, has ample room for a passport, a debit card, and cash, and is comfortable against the skin.
I much prefer this alpha keeper, as it has nice zippers, it contains RFID technology to protect against theft, and comes with a nice adjustable strap which fits up to 55-inch waist. Also, the breathable mesh for comfort is a must, especially in hot climates.

#ad
If you are moving to Siem Reap, you will likely never need pants again. I am a huge fan of yoga pants. They are like sweat pants, but also a little classier than shorts. A pair like these with zippers on the pockets will help you keep your belongs more secure, while also staying cool and comfortable.
#ad
